Skip to product information
1 of 8

PayPal, credit cards. Download editable-PDF and invoice in 1 second!

GB/T 37829-2019 English PDF (GBT37829-2019)

GB/T 37829-2019 English PDF (GBT37829-2019)

Regular price $225.00 USD
Regular price Sale price $225.00 USD
Sale Sold out
Shipping calculated at checkout.
Quotation: In 1-minute, 24-hr self-service. Click here GB/T 37829-2019 to get it for Purchase Approval, Bank TT...

GB/T 37829-2019: Iron ore fines in bulk -- Determination of transportable moisture limits -- Flow-table method

This Standard specifies the flow-table test method for the transportable moisture limit (TML) of iron ore fines in bulk. This Standard is applicable to the determination of the transportable moisture limit of iron ore fines with a nominal maximum particle size of 1 mm; and iron ore fines with a nominal maximum particle size of 1 mm ~ 7 mm can be used as a reference.
GB/T 37829-2019
GB
NATIONAL STANDARD OF THE
PEOPLE’S REPUBLIC OF CHINA
ICS 73.060.10
D 31
Iron Ore Fines in Bulk – Determination of
Transportable Moisture Limits – Flow-Table Method
ISSUED ON: AUGUST 30, 2019
IMPLEMENTED ON: JULY 01, 2020
Issued by: State Administration for Market Regulation;
Standardization Administration of PRC.
Table of Contents
Foreword ... 3
1 Scope ... 4
2 Normative References ... 4
3 Terms and Definitions ... 5
4 Principle ... 5
5 Instrument ... 5
6 Preparation of the Specimen ... 6
7 Pre-Test of Flow Moisture Point ... 7
8 Main Test of Flow Moisture Point ... 8
9 Calculation of Flow Moisture Point ... 9
10 Calculation of Transportable Moisture Limits (TML) ... 9
11 Precision ... 10
12 Test Report ... 10
Appendix A (Normative) Flow Table Instrument and Rammer ... 11
Appendix B (Informative) Specimen for Precision Test ... 17
Iron Ore Fines in Bulk – Determination of
Transportable Moisture Limits – Flow-Table Method
WARNING: Personnel using this Standard shall have practical experience in working in formal laboratory. This Standard does not address all possible safety issues. The user is responsible for taking appropriate safety and health measures and ensuring compliance with the conditions stipulated by relevant national laws and regulations.
1 Scope
This Standard specifies the flow-table test method for the transportable moisture limit (TML) of iron ore fines in bulk.
This Standard is applicable to the determination of the transportable moisture limit of iron ore fines with a nominal maximum particle size of 1 mm; and iron ore fines with a nominal maximum particle size of 1 mm ~ 7 mm can be used as a reference. 2 Normative References
The following documents are essential to the application of this document. For the dated documents, only the versions with the dates indicated are applicable to this document; for the undated documents, only the latest version (including all the amendments) is applicable to this document.
GB/T 6379.1 Accuracy (Trueness and Precision) of Measurement Methods and Results - Part 1: General Principles and Definitions
GB/T 6379.2 Accuracy (Trueness and Precision) of Measurement Methods and Results - Part 2: Basic Method for the Determination of Repeatability and Reproducibility of a Standard Measurement Method
GB/T 10322.1 Iron Ores - Sampling and Sample Preparation Procedures
GB/T 10322.5 Iron Ores - Determination of the Moisture Content of a Lot GB/T 20565 Iron Ores and Direct Reduced Iron - Vocabulary
specified number of test samples with a thickness not exceeding 31.5mm. 5.4 Measuring cylinder: A glass measuring cylinder with a scale of 100mL and 10mL respectively.
5.5 Mixing container: A mixing container capable of satisfying about 5kg of iron ore fines or an automatic mixer of a considerable size.
5.6 Balance: The maximum weighable is no less than 2kg, accurate to 0.1g. 5.7 Oven: With automatic temperature control and blast device, the temperature can be controlled at 105°C±5°C.
5.8 Vernier calliper, accurate to 0.1mm.
6 Preparation of the Specimen
6.1 General requirements
The sample shall be carried out in a room free from changes in temperature, airflow and humidity; and the sample preparation phase and the test process shall be completed in the same day. In addition, the container for the specimen shall be a closed container or covered with plastic film and other suitable materials. In order to prevent possible changes in the fluidization characteristics of bulk iron ore fines, samples must not be broken during sample preparation.
6.2 Preparation of the specimen
Take samples according to GB/T 10322.1. Put a representative specimen of iron ore fines into a mixing container and stir thoroughly; and then divide the specimen into a specimen for original moisture measurement (Specimen A), a pre-test specimen (Specimen B) and specimens for two parallel main tests (Specimens C and D). The amount of the specimen for the original moisture measurement is about 1kg; weigh it immediately; and determine the moisture content of the specimen "on receipt" according to GB/T 10322.5. The pre-test and the single main test respectively require the specimen volume to be no less than 3 times the mould capacity. The sample volume varies with the mass ratio of iron ore fines, which is about 3kg respectively. 6.3 Filling the round mould
Place the round mould in the centre of the flow table; and fill the round mould with the specimen thoroughly stirred in the mixing container in three layers. The first layer after tamping shall account for about one-third of the depth of the round mould. The second layer after tamping shall reach about two-thirds of the depth of the round mould. And the last layer after tamping of specimen should be filled to about 5mm down from the top of the round mould.
into the mixer container; and spray 5mL~10mL or more of water on the surface of the specimen; and then stir the specimen evenly. Repeat procedures 6.3 ~ 6.5 until it reaches a fluid state.
7.2.2 The vibration of the flow table causes the particles to be re-embedded to form a compact state, which increases the percentage of water content in the specimen in a certain state. When the moisture is saturated in the compact specimen and the specimen is plastically deformed, that is, the flow state is generated; it is considered that the moisture content of the specimen has reached the flow moisture point. At this time, the truncated cone shall deform to form a convex or concave surface. In most cases, measuring deformation helps to determine whether plastic flow has occurred. The following states are used as one of the characteristics for judging whether the specimen has reached the plastic flow state:
a) Use a vernier calliper to measure the feature that the diameter of any part of the truncated cone increases by more than 3mm;
b) Add water equivalent to 0.4%~0.5% moisture content; repeat the procedures 6.3~6.5; vibrate the flow table for 25 times. Measure the bottom or middle diameter of the truncated cone; for the first time, the diameter shall increase by 1mm~5mm; add water again; then the bottom diameter shall increase by
5mm~10mm;
c) When the water content (increasing gradually) is close to the flow water point, the truncated cone shall have a tendency to stick in the round mould;
d) When the truncated cone is pushed out of the flow table, wet marks (streaks) shall be left on the flow table, which indicates that the water content may exceed the flow moisture point; but the invisible wet marks (streaks) do not indicate that the water content is lower than the flow moisture point.
8 Main Test of Flow Moisture Point
After reaching the fluid state in the pre-test, adjust the water content of Specimen C and Specimen D to be 1% to 2% lower than the last water content that did not cause fluidization in the pre-test. The final test is carried out by Specimen C and Specimen D with adjusted water content. The method is the same as the pre-test, but the amount of water added each time does not exceed 0.5%. The lower the flow moisture point in the pre-test, the smaller the amount of the added water.
When the specimen taken from Specimen C and Specimen D are adjusted to start plastic flow or that of after a little water is added; the specimen in the round mould can be placed in a clean container of known mass and weighed immediately; and test the moisture content. Otherwise, put it back into the mixer container and continue with the above procedures. The moisture at this time is the that before reaching the flow state. TML – mass fraction of transportable moisture limits; the calculated results shall be retained to two digits after the decimal point;
𝐹𝑀𝑃̅̅ ̅̅ ̅̅ – mass fraction of the average flow moisture point of the specimen, in %; take the average value of two test results of Specimens C and D.
11 Precision
The precision data of this Standard is the test result of the joint analysis of 5 iron ore fines specimens by 10 laboratories in 2017, which is obtained by statistical analysis according to GB/T 6379.1 and GB/T 6379.2: Repeatability limit r = 0.17%, reproducibility limit R = 0.62%. Refer to Appendix B for the test specimen. 12 Test Report
The test report shall include the following contents:
a) Sample number;
b) A detailed description of the sample;
c) Basis standard (number of this Standard);
d) Special instructions;
e) Test results;
f) Any deviation from the Standard;
g) Abnormal phenomena in the test;
h) Test date.
Appendix A
(Normative)
Flow Table Instrument and Rammer
A.1 Flow table instrument
A.1.1 Flow table and seat frame
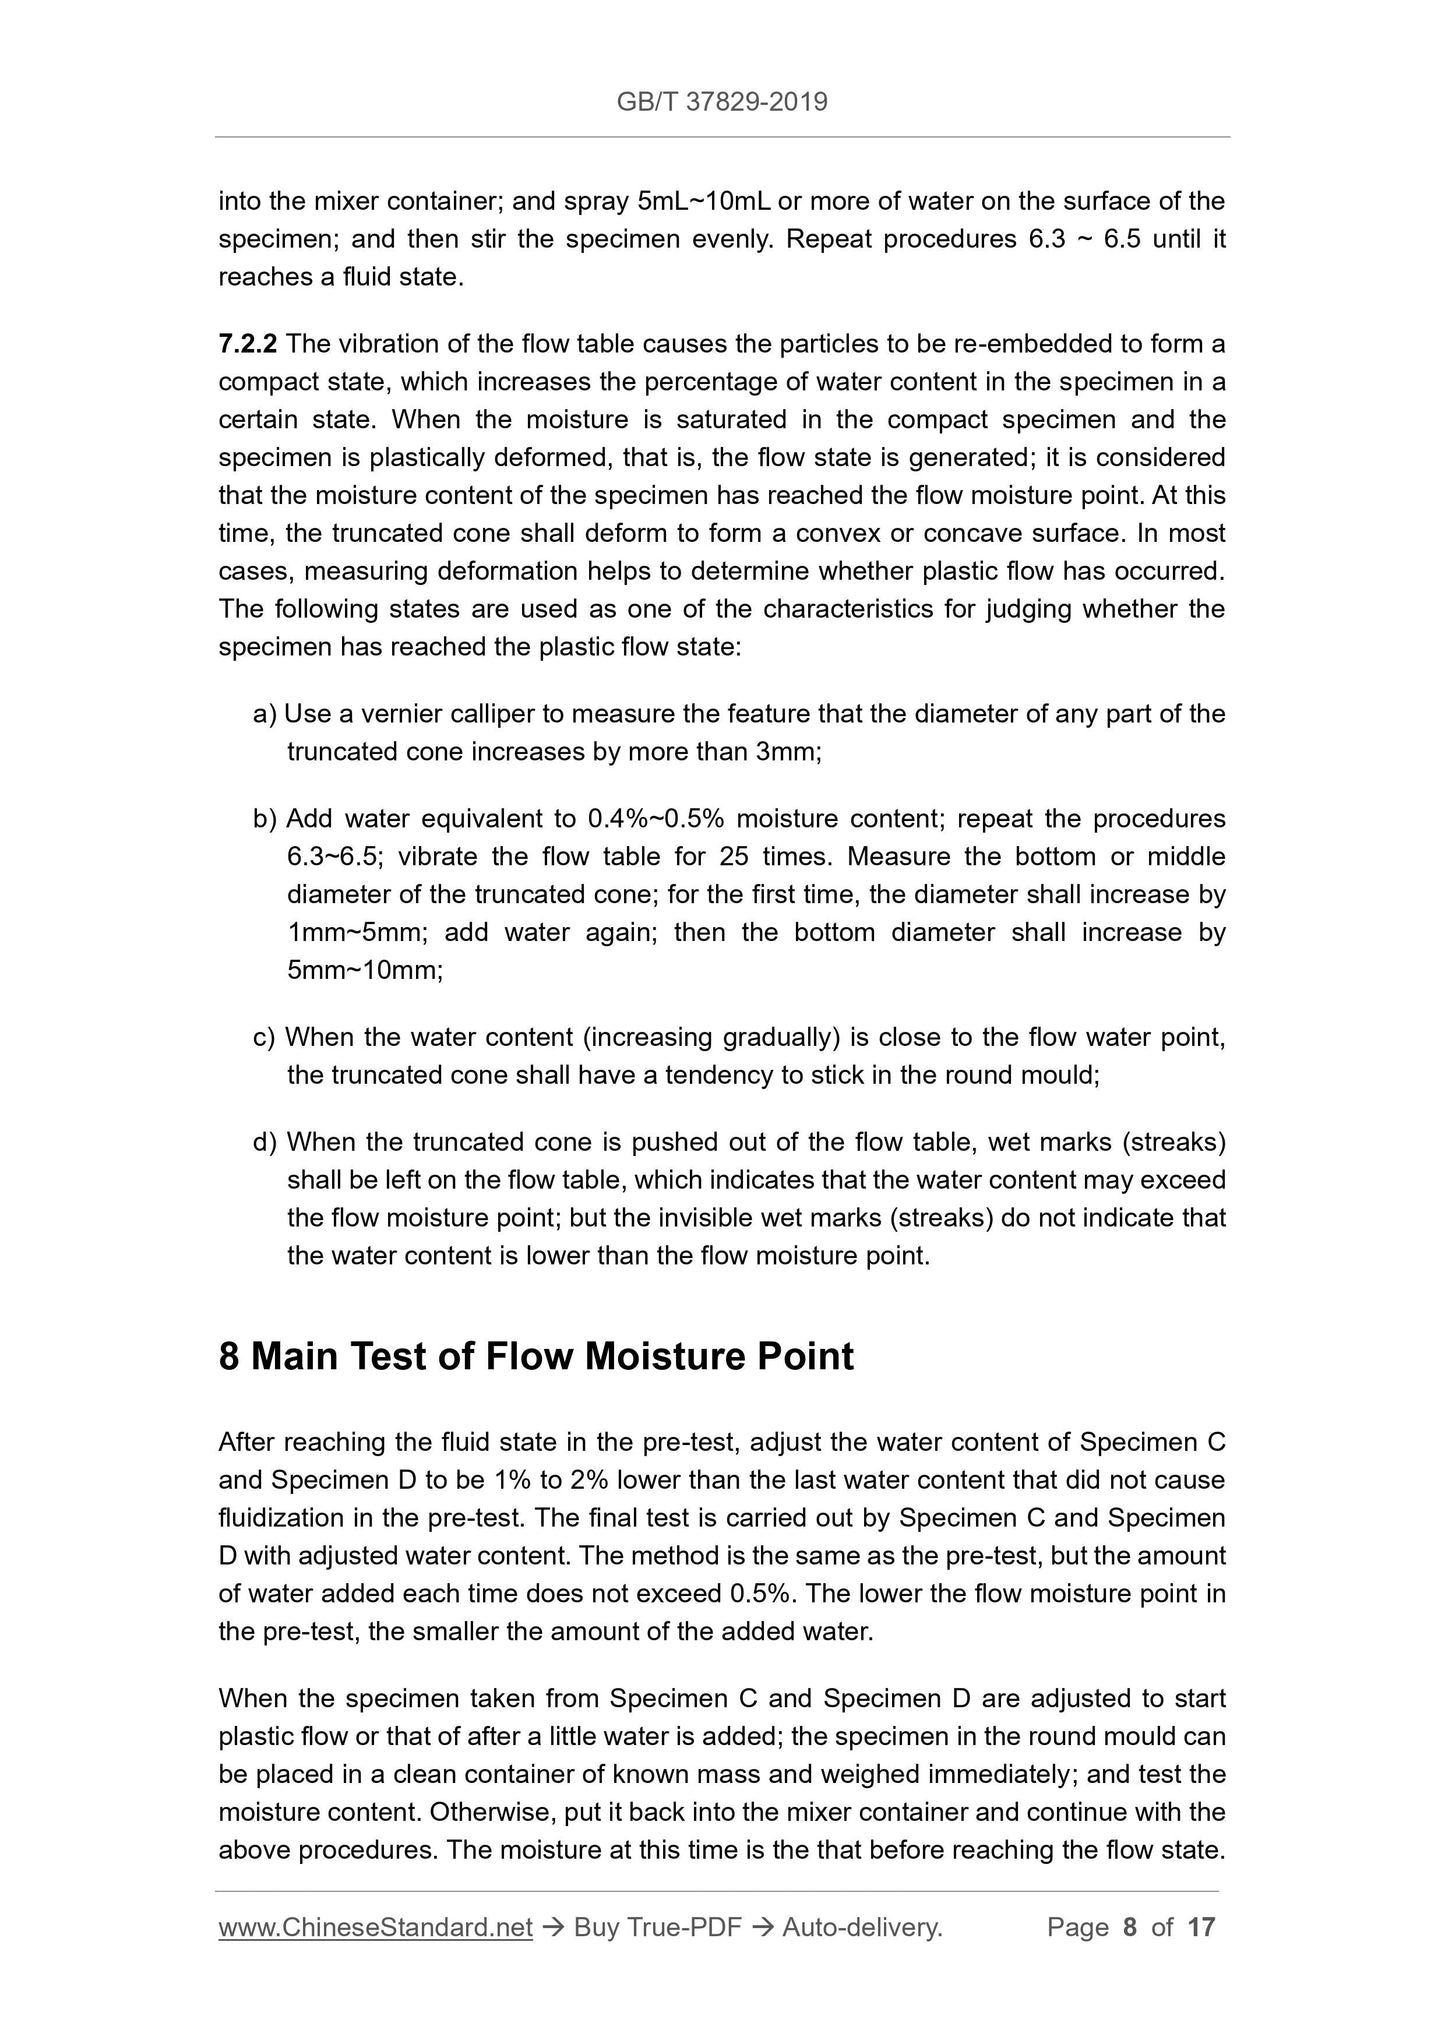
The structure of the flow table is shown in Figure A.1. The flow table is composed of an integrally cast rigid iron frame and a rigid round plate with a diameter of 254mm±2.54mm; and a shaft is connected perpendicularly to the plate with a spiral thread. The plate surface connected with the shaft and the integral contact shoulder of the shaft shall be installed on a frame; so that it can be raised and dropped vertically from the specified height with a rotating cam. The allowable error of the height of the new flow table is ±0.13mm; while that of the flow table in use is ±0.39mm. The plate surface shall be a well-machined flat surface, free of bubbles or surface defects. The plate surface shall be made of brass or bronze; the Rockwell hardness number is no less than HRB25; the edge thickness is 7.62mm; and there shall be 6 integral radial strengthening ribs. The mass of the plate surface and the shaft connected to it is 4kg±0.05kg; and the mass shall be symmetrically distributed around the axis. Unit: mm
Key:
f – line on the plate surface.
Figure A.1 – Flow Table
A.1.2 Cam and vertical shaft
The cam and vertical shaft shall be made of medium-carbon mechanical steel; and hardened at part A as shown in Figure A.2. The shaft shall be straight. The difference between the shaft diameter of the new flow table and the inner diameter of the frame cavity cylinder shall be no less than 0.05mm and no more than 0.08mm. The flow table in use shall be kept at 0.051mm~0.26mm. When the shaft falls to the end; the shaft end shall not fall on the cam; but the point of fall shall contact the cam at an angle of no less than 120°. The cam surface shall be a smooth spiral curved surface with a radius uniformly increased from 132.70mm (Translator Note: here it shall be 12.70mm according to the Figure A.2) to 31.75mm within the range of 360°; and there shall be no obvious vibration when the shaft is in contact with the cam.
The position of the cam and the contact surface between the cam and the shaft should make the rotation of the flow table no more than one revolution for 25 drops. The surface of the flow table and the frame that come into contact when falling to the bottom should remain smooth, flat and level, parallel to the upper surface of the flow table; and continue to contact throughout the entire 360° range.

View full details