GB/T 13306-2011 English PDF (GBT13306-2011)
Regular price
$85.00 USD
Regular price
Sale price
$85.00 USD
Unit price
/
per
Delivery: 3 seconds. Download true-PDF + Invoice.
Get QUOTATION in 1-minute: Click GB/T 13306-2011
Historical versions: GB/T 13306-2011
Preview True-PDF (Reload/Scroll if blank)
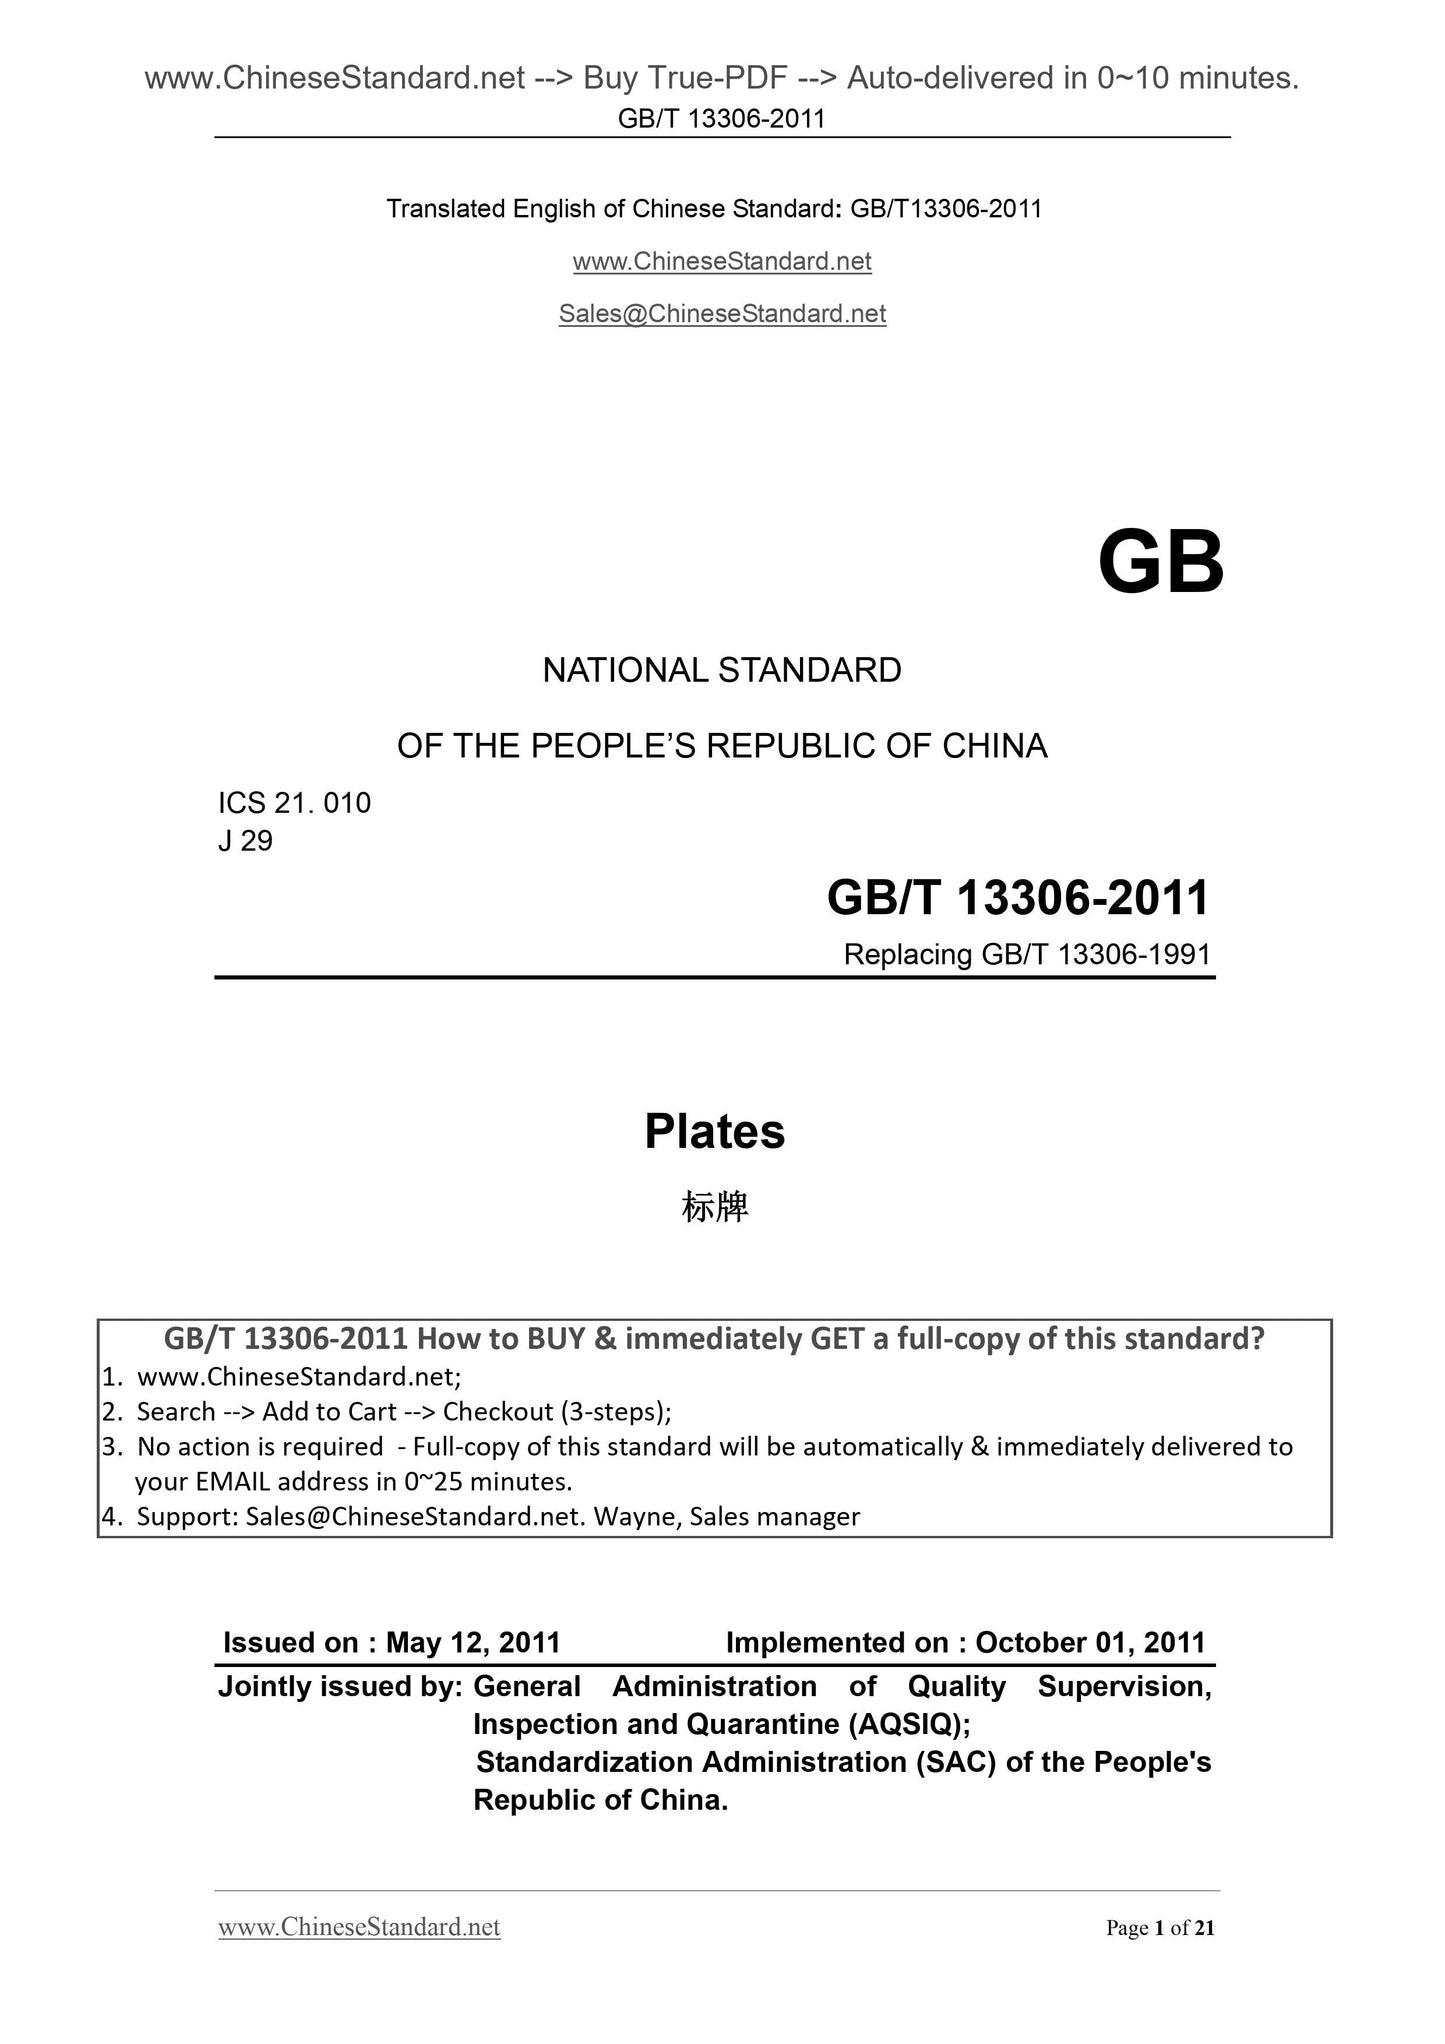
GB/T 13306-2011: Plates
GB/T 13306-2011
GB
NATIONAL STANDARD
OF THE PEOPLE’S REPUBLIC OF CHINA
ICS 21. 010
J 29
Replacing GB/T 13306-1991
Plates
Issued on . May 12, 2011 Implemented on . October 01, 2011
Jointly issued by. General Administration of Quality Supervision,
Inspection and Quarantine (AQSIQ);
Standardization Administration (SAC) of the People's
Republic of China.
Table of Contents
Foreword ... 3
1 Scope ... 4
2 Normative References ... 4
3 Types and Dimensions ... 5
4 Marking ... 15
5 Technical Requirements ... 16
6 Inspection Methods ... 19
7 Inspection Rules ... 20
8 Packing, Transportation and Storage ... 20
Foreword
This Standard is drafted according to the rules given in GB/T 1.1-2009 "Directives
for Standardization-Part 1. Structure and Drafting of Standards".
This Standard replaces GB/T 13306-1991 "Plates". Compared with GB/T
13306-1991, the main technical changes of this Standard are as follows.
- Adjust the structure and contents of this Standard;
- Add the marking method of plates;
- Modify the material requirements and surface treatment requirements in the
technical requirements.
This Standard was proposed by and shall be under the jurisdiction of China
Machinery Industry Federation.
Drafting organizations of this Standard. China Productivity Center for Machinery,
and Hefei Anlian Trading Co., Ltd.
Chief drafting staffs of this Standard. Li Weirong, Feng Feng, Tang Dong, and
Dou Zhi.
The previous edition replaced by this Standard is.
- GB/T 13306-1991.
Plates
1 Scope
This Standard specifies the PLATES’ types and dimensions, marking, technical
requirements, inspection methods, inspection rules, packing, storage and
transportation.
This Standard is applicable to the nameplates, operational sign plates, illustration
plates, line schematic diagram plates, design data chart plates, safety sign plates
and others (generally referred to as "plates") of various electromechanical
equipment, instruments and apparatuses, and various components.
The Chapter “Types and Dimensions” in this Standard is not applicable to the
panels, dial plates, trademarks and artistic decoration plates of instruments,
apparatuses and household electrical appliances. However, the technical
requirements (see Chapter 5) in this Standard may be acted as a reference for
the above products.
2 Normative References
The following documents are essential for the application of this Standard. For
the dated references, only the dated editions are applicable to this document. For
undated references, the latest edition of the normative document (including all
amendments) referred to applies.
GB/T 191 "Packaging - Pictorial Marking for Handling of Goods"
GB/T 730 "Textiles - Tests for Colour Fastness - Quality Control of Blue Wool
Reference Materials 1 to 7"
GB/T 827 “Rivets for Name Plate”
GB/T 1720 "Method of Test for Adhesion of Paint Films"
GB/T 1804 "General Tolerances - Tolerances for Linear and Angular
Dimensions without Individual Tolerance Indications"
GB/T 2423.3 "Environmental Testing for Electric and Electronic Products -
Part 2. Testing Method - Test Cab. Damp Heat Steady State"
GB/T 2423.16 "Environmental Testing for Electric and Electronic Products -
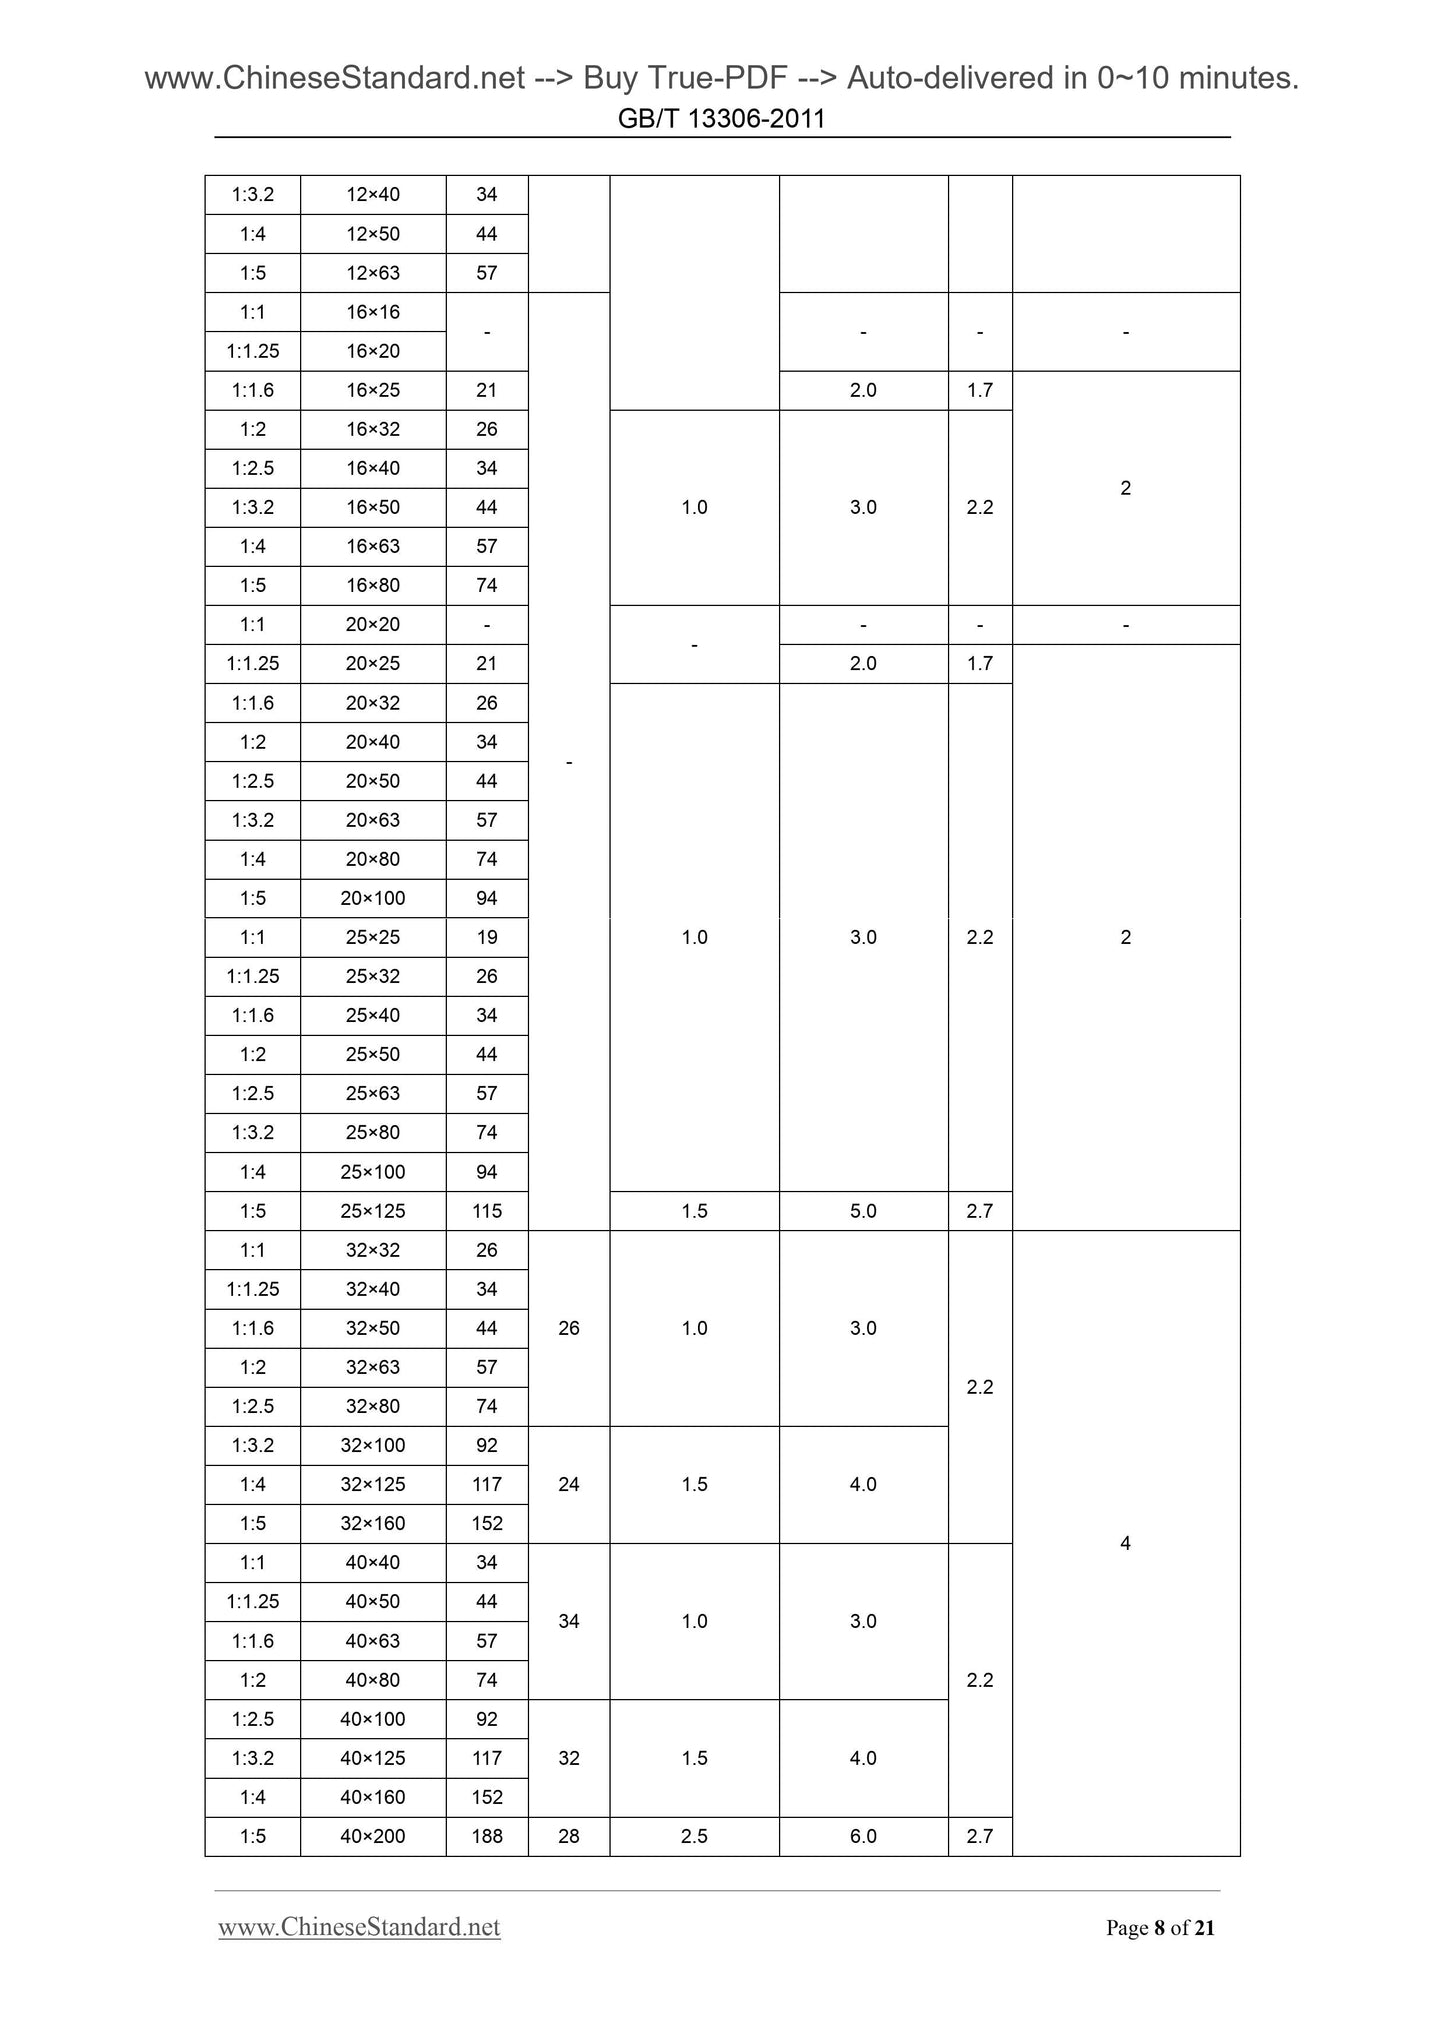
1.3.2 12×40 34
1.4 12×50 44
1.5 12×63 57
1.1 16×16
- - -
1.1.25 16×20
1.1.6 16×25 21 2.0 1.7
1.2 16×32 26
1.0 3.0 2.2
1.2.5 16×40 34
1.3.2 16×50 44
1.4 16×63 57
1.5 16×80 74
1.1 20×20 -
- - -
1.1.25 20×25 21 2.0 1.7
1.1.6 20×32 26
1.0 3.0 2.2
1.2 20×40 34
1.2.5 20×50 44
1.3.2 20×63 57
1.4 20×80 74
1.5 20×100 94
1.1 25×25 19
1.1.25 25×32 26
1.1.6 25×40 34
1.2 25×50 44
1.2.5 25×63 57
1.3.2 25×80 74
1.4 25×100 94
1.5 25×125 115 1.5 5.0 2.7
1.1 32×32 26
26 1.0 3.0
2.2
1.1.25 32×40 34
1.1.6 32×50 44
1.2 32×63 57
1.2.5 32×80 74
1.3.2 32×100 92
24 1.5 4.0 1.4 32×125 117
1.5 32×160 152
1.1 40×40 34
34 1.0 3.0
2.2
1.1.25 40×50 44
1.1.6 40×63 57
1.2 40×80 74
1.2.5 40×100 92
32 1.5 4.0 1.3.2 40×125 117
1.4 40×160 152
1.5 40×200 188 28 2.5 6.0 2.7
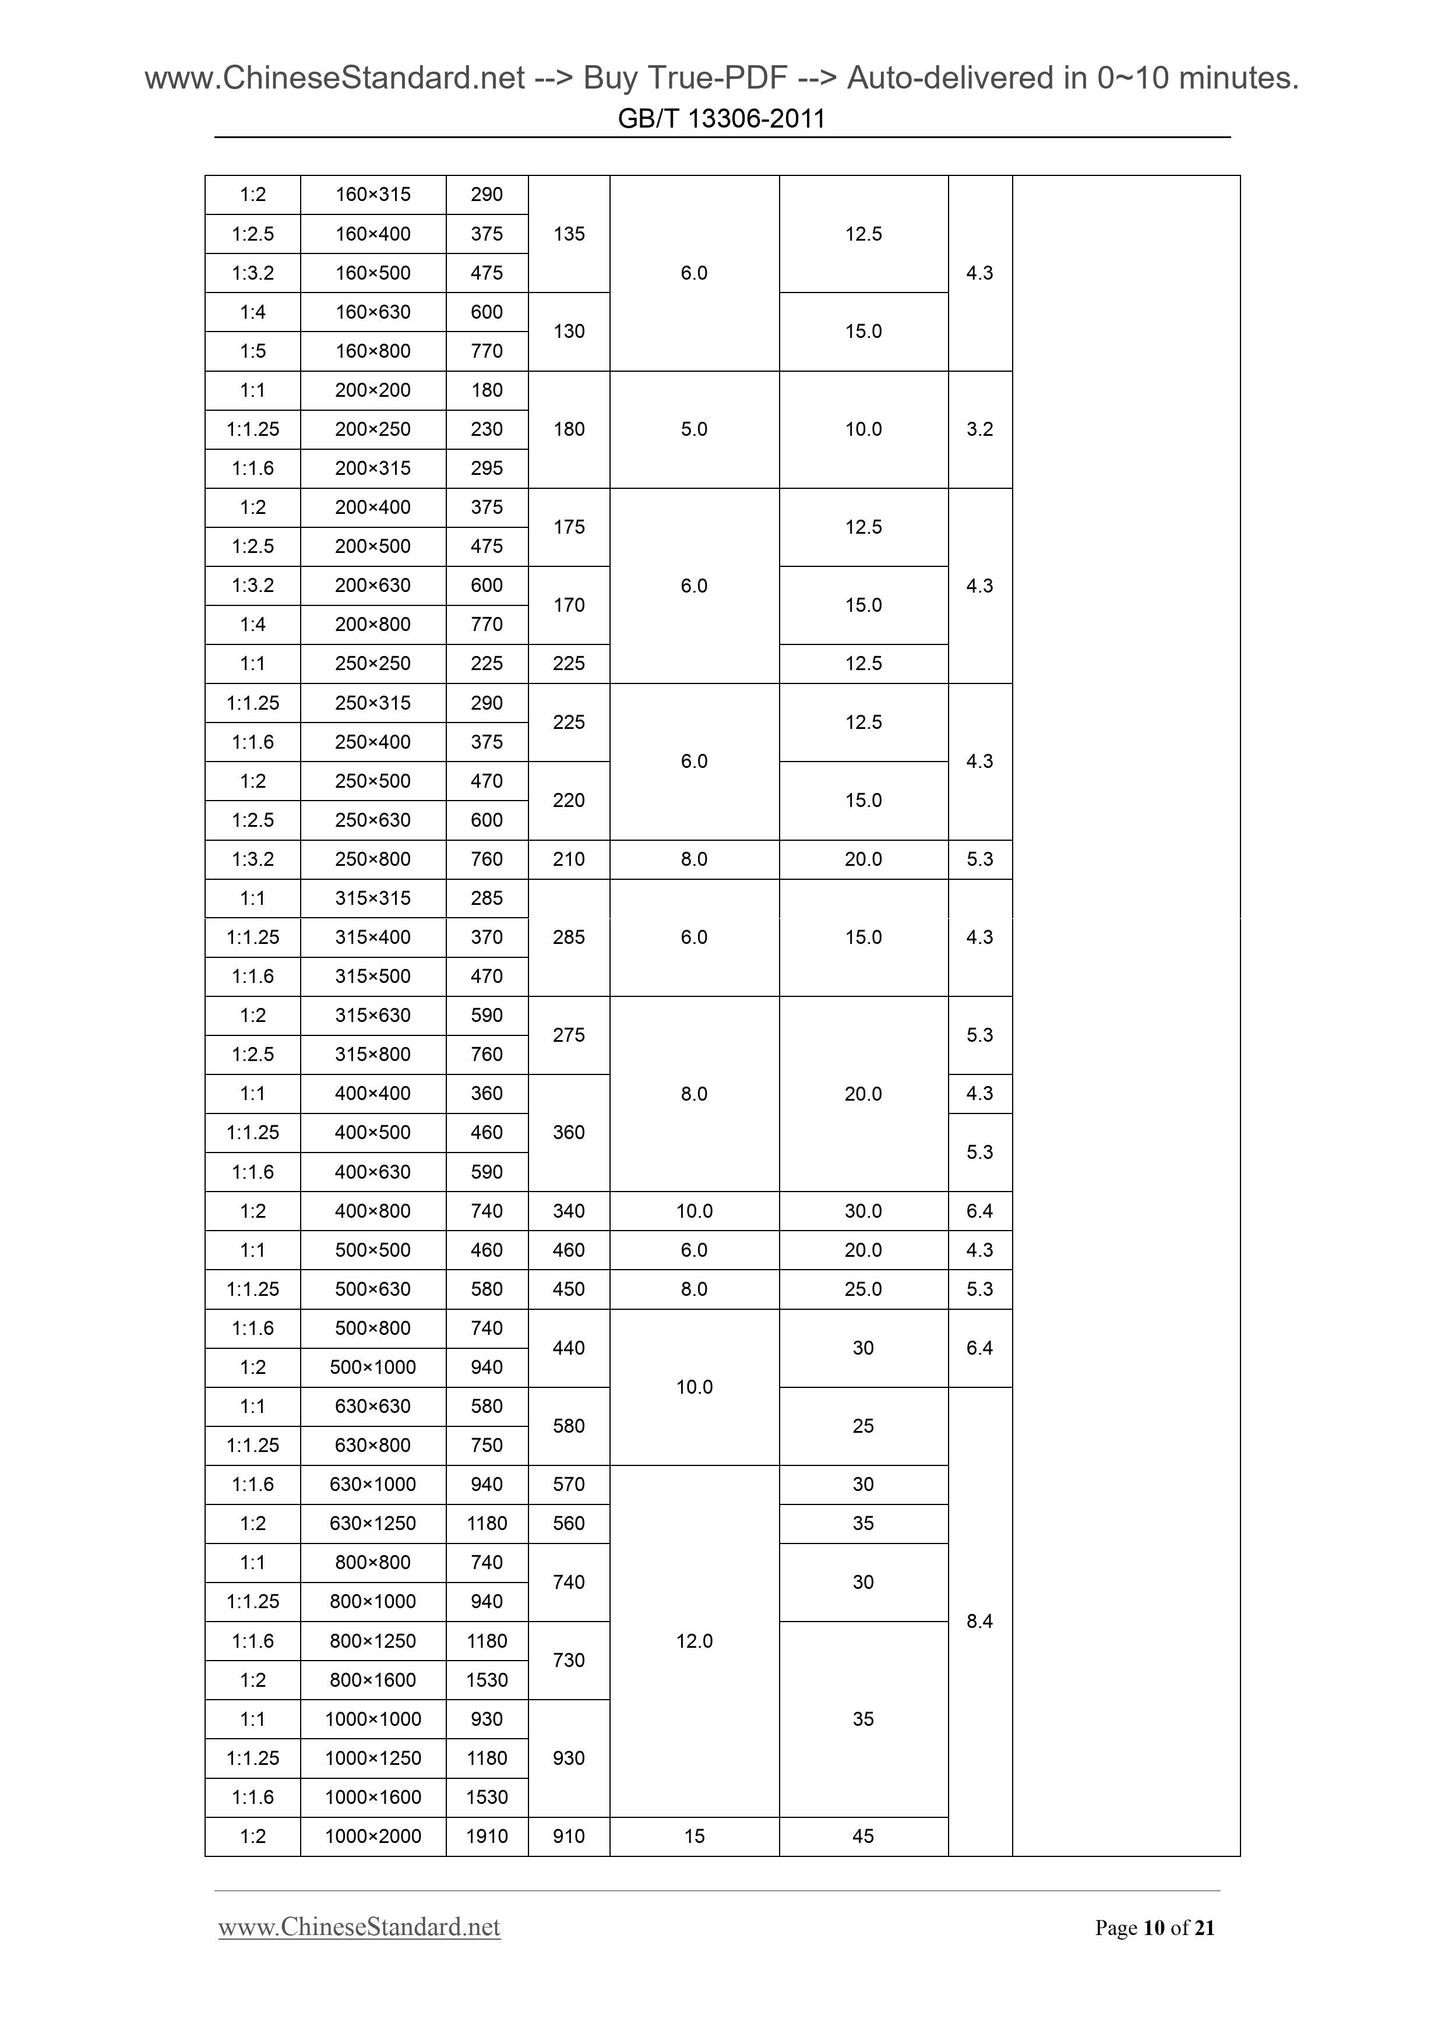
1.2 160×315 290
6.0
12.5
4.3
1.2.5 160×400 375
1.3.2 160×500 475
1.4 160×630 600
130 15.0
1.5 160×800 770
1.1 200×200 180
180 5.0 10.0 3.2 1.1.25 200×250 230
1.1.6 200×315 295
1.2 200×400 375
6.0
12.5
4.3
1.2.5 200×500 475
1.3.2 200×630 600
170 15.0
1.4 200×800 770
1.1 250×250 225 225 12.5
1.1.25 250×315 290
6.0
12.5
4.3
1.1.6 250×400 375
1.2 250×500 470
220 15.0
1.2.5 250×630 600
1.3.2 250×800 760 210 8.0 20.0 5.3
1.1 315×315 285
285 6.0 15.0 4.3 1.1.25 315×400 370
1.1.6 315×500 470
1.2 315×630 590
8.0 20.0
5.3
1.2.5 315×800 760
1.1 400×400 360
4.3
1.1.25 400×500 460
5.3
1.1.6 400×630 590
1.2 400×800 740 340 10.0 30.0 6.4
1.1 500×500 460 460 6.0 20.0 4.3
1.1.25 500×630 580 450 8.0 25.0 5.3
1.1.6 500×800 740
10.0
30 6.4
1.2 500×1000 940
1.1 630×630 580
8.4
1.1.25 630×800 750
1.1.6 630×1000 940 570
12.0
1.2 630×1250 1180 560 35
1.1 800×800 740
1.1.25 800×1000 940
1.1.6 800×1250 1180
1.2 800×1600 1530
1.1 1000×1000 930
930 1.1.25 1000×1250 1180
1.1.6 1000×1600 1530
1.2 1000×2000 1910 910 15 45
Example 3. Round plates made of commercial purity aluminium 1060, with
D=32mm.
Y32-1060 GB/T 13306
Example 4. Sector plates made of commercial purity aluminium 1050A, with
B=16mm, R=32mm and φ=75°.
Sh16×32×75°-1050A GB/T 13306
5 Technical Requirements
5.1 Dimension and Tolerance of Plates
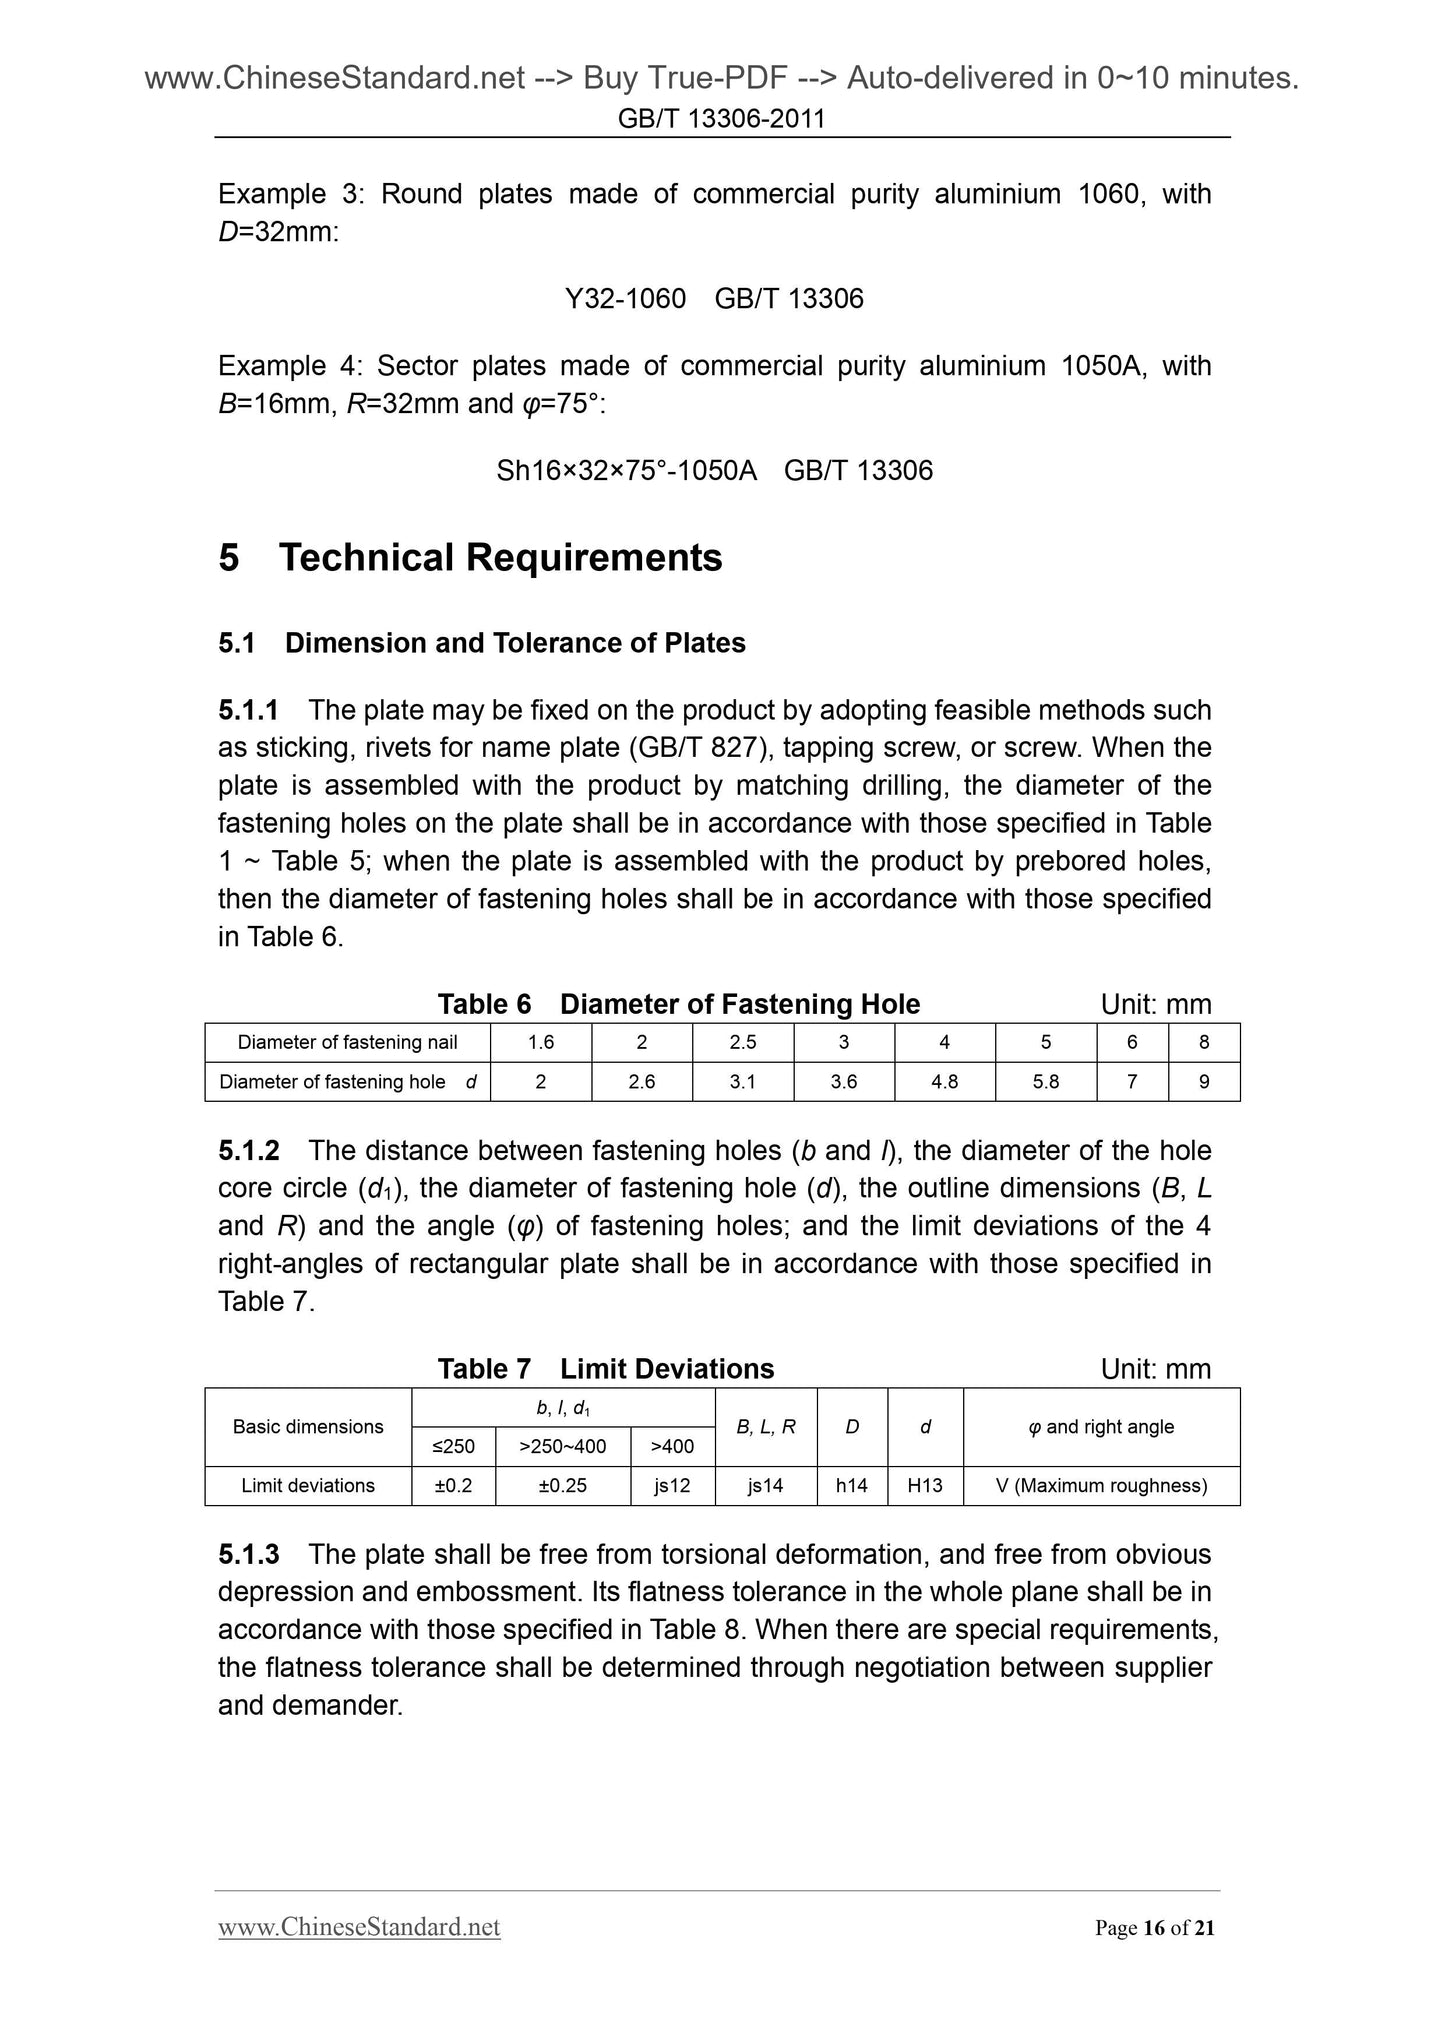
5.1.1 The plate may be fixed on the product by adopting feasible methods such
as sticking, rivets for name plate (GB/T 827), tapping screw, or screw. When the
plate is assembled with the product by matching drilling, the diameter of the
fastening holes on the plate shall be in accordance with those specified in Table
1 ~ Table 5; when the plate is assembled with the product by prebored holes,
then the diameter of fastening holes shall be in accordance with those specified
in Table 6.
Table 6 Diameter of Fastening Hole Unit. mm
Diameter of fastening nail 1.6 2 2.5 3 4 5 6 8
Diameter of fastening hole d 2 2.6 3.1 3.6 4.8 5.8 7 9
5.1.2 The distance between fastening holes (b and l), the diameter of the hole
core circle (d1), the diameter of fastening hole (d), the outline dimensions (B, L
and R) and the angle (φ) of fastening holes; and the limit deviations of the 4
right-angles of rectangular plate shall be in accordance with those specified in
Table 7.
Table 7 Limit Deviations Unit. mm
Basic dimensions
b, l, d1
B, L, R D d φ and right angle
≤250 >250~400 >400
Limit deviations ±0.2 ±0.25 js12 js14 h14 H13 V (Maximum roughness)
5.1.3 The plate shall be free from torsional deformation, and free from obvious
depression and embossment. Its flatness tolerance in the whole plane shall be in
accordance with those specified in Table 8. When there are special requirements,
the flatness tolerance shall be determined through negotiation between supplier
and demander.
5.4 Appearance requirements
5.4.1 For the plates with frame, the frame line around the fastening holes is
allowed to be made into arc shape.
5.4.2 The plates stuck by gum are not required to have...